You can build a sturdy 8×10 shed in two weekends for roughly the cost of a mid-range riding mower, provided you do not pour concrete.
The stage most first-timers botch is the foundation: skip the 811 call, hit a gas line, and your Saturday budget turns into a five-figure emergency bill.
I learned our ten-foot side-yard setback only after twenty minutes on hold with the building department; six feet closer and the permit gets denied outright.
[link-whisper-related-posts]1. Planning and Permitting
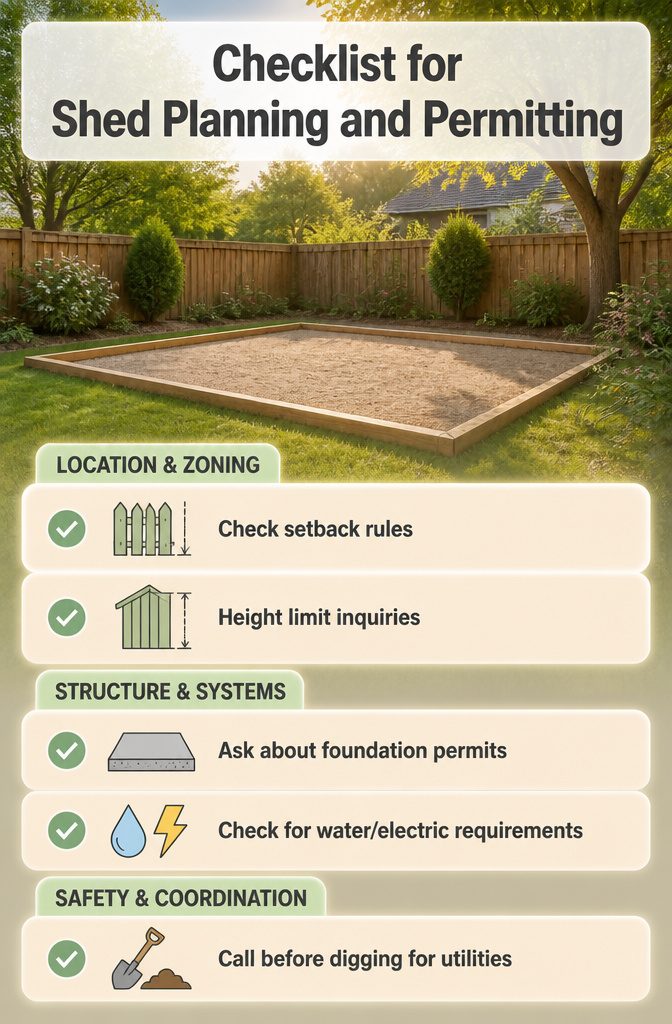
Setback rules decide where a shed can actually sit on your lot. Most municipalities measure the distance from your property line to the shed wall, and that number is rarely negotiable.
I spent twenty minutes on hold with my building department before I learned our side-yard setback was ten feet; six feet closer and the permit gets denied.
Height limits matter too, especially if you are thinking about a second story for storage later.
Ask the inspector three things: whether a gravel pad counts as permanent foundation, what triggers electrical permitting, and whether a plumbing stub changes your shed from accessory structure to habitable space.
The answers flip the project from a Saturday build to a months-long permit track.
Water and electricity almost always pull a permit requirement, even when the shed itself would otherwise skate by unregulated.
One neighbor poured footings without checking and had to tear the whole slab out. The building department will not chase you down with advice, but they will stop work the moment a complaint lands.
2. Selecting a Location
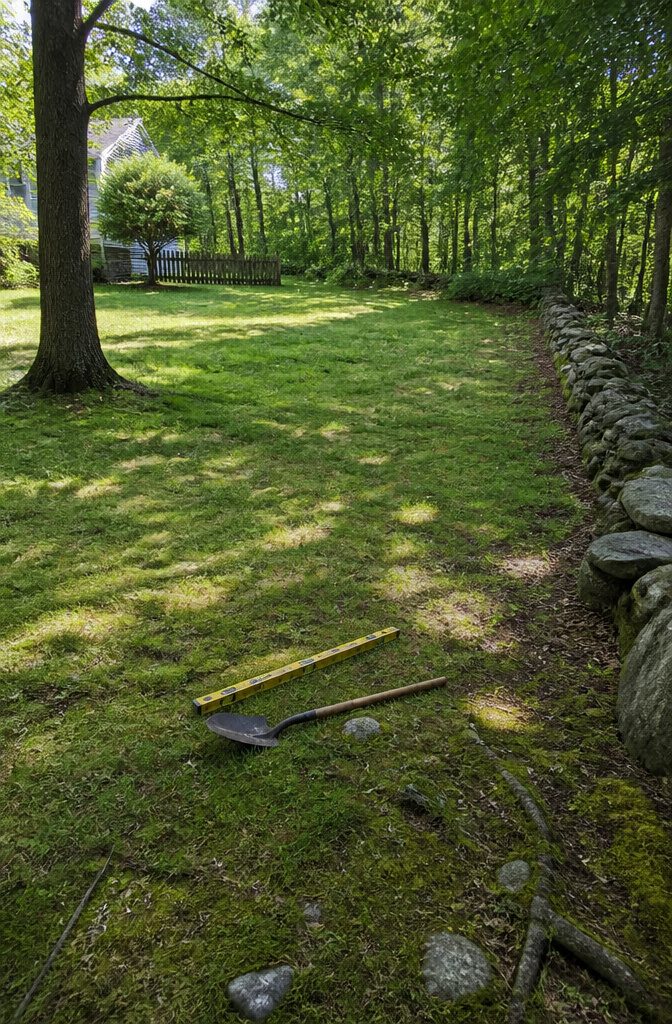
Flat ground matters more than the view. A terrace that already looks level to the eye can still need three evenings of shovel and 4-foot level work to get the pad right.
A shed pad needs to stay within 4 inches of level across a 10-foot wall or you are paying for site work or shimming with cinder blocks that never feel quite right under the sill.
Dry beats convenient every time. The lowest spot on your property will collect water, and water means rotting wood, blistering paint, and hinges that seize before their first season ends.
I check after a hard rain and watch where the puddle forms; that is where the shed does not go.
Sun and space around the walls do the work you cannot do later. A few feet of clearance on all sides lets the siding breathe and keeps mold and mildew from finding a home in the shade of overhanging branches.
Roots will find a foundation the way they find a water line, slow and certain.
Workshop use means thinking about afternoon light and a path to the house for power.
My shed sits far enough from the maple to keep the gutters clean, close enough to the kitchen door that an extension cord is not a trip hazard across the lawn.
3. Laying the Foundation
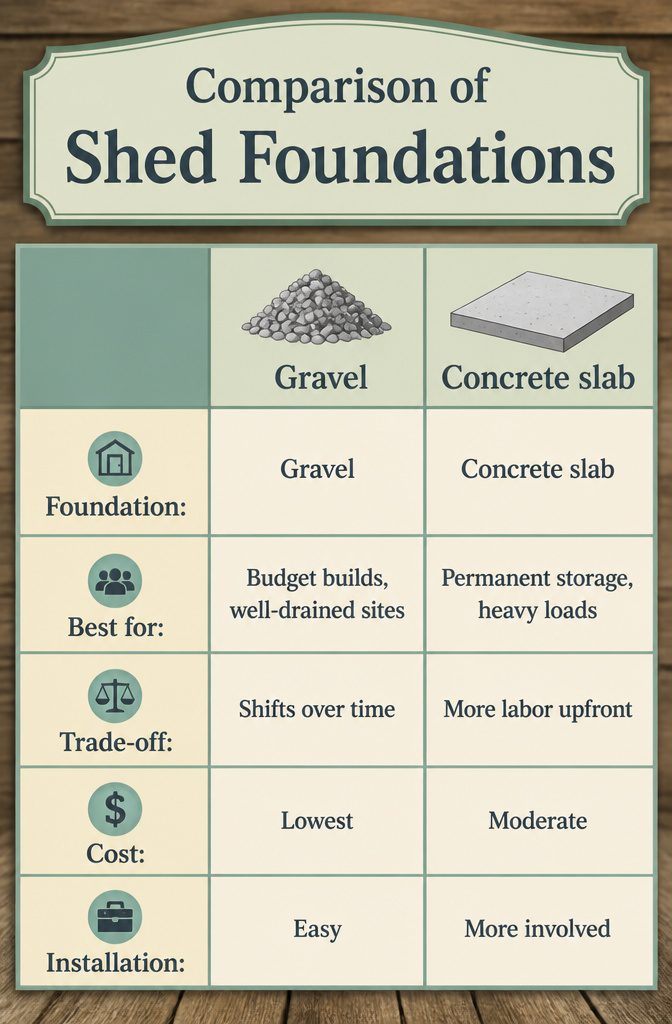
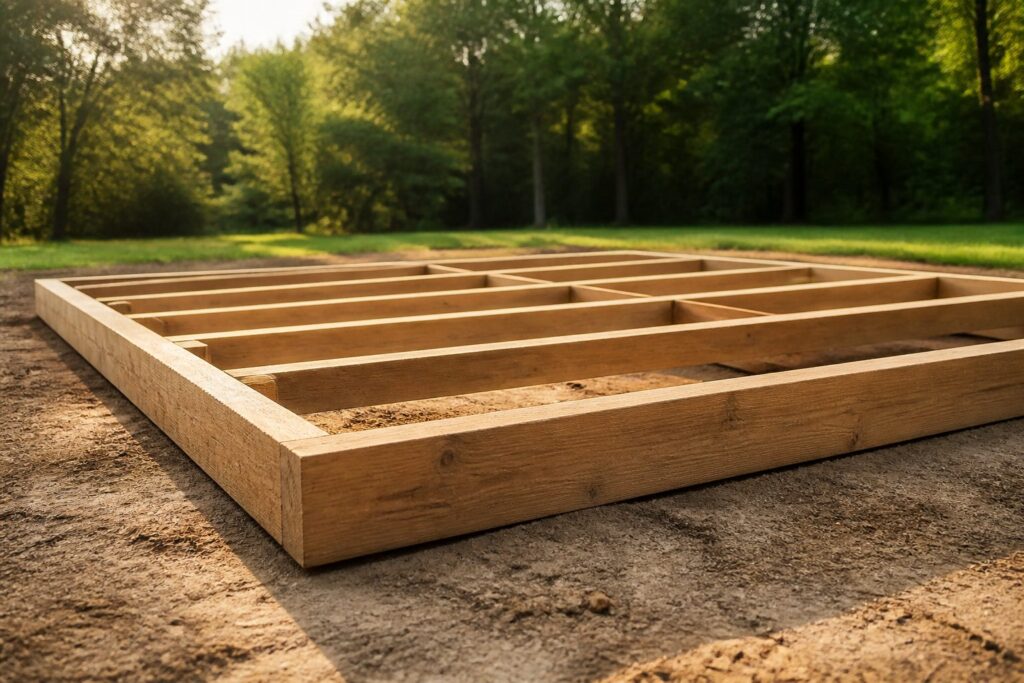
A shed floor sitting directly on the ground will rot, invite rodents, and eventually shift or sag as the soil erodes. The bottom of your foundation needs to stay at least 2 inches above grade, no matter which base you choose.
Three paths cover most backyard builds. Gravel beds drain fast and cost the least, though they work best when your soil already sheds water well.
A concrete slab handles heavier loads and outlasts the shed itself, and if you mix and pour it yourself the price lands surprisingly close to a wood platform.
Treated 6×6 skids or concrete blocks get you building the same weekend and leave the structure movable later, which matters if you rent or suspect you’ll reorganize the yard.
| Foundation | Best for | Trade-off |
|---|---|---|
| Gravel | Budget builds, well-drained sites | Shifts over time, not for heavy equipment |
| Concrete slab | Permanent storage, heavy loads | More labor upfront, fixed in place |
| Treated skids/blocks | Speed, portability, smaller sheds | Less stable on soft or sloped ground |
Before you dig, call 811 to have utilities marked. It is free in most areas, and hitting a line is the kind of mistake that turns a Saturday project into a very expensive Monday.

Size: Inner diameter: 1/4", 1/2", 3/8", each length: 50 feet, color: black. Our split loom is split and easy to put wires in

【Premium Liquid-Tight Conduit】- Length :25',ID:1/2inch,OD:0.83inch,Thick: 2.5 mm The Flexible Non Metallic Liquid Tight Electrical Conduit kit is constructed with Resists corrosion PVC to ensure quality and service life.

Liquid Tight Conduit Kit: Our liquid-tight conduits are made of antioxidant PVC material, featuring a smooth interior for easier wire pulling. Length: 25 feet, Comes with 4 straight and 3 90-degree conduit connectors
4. Building the Floor Frame
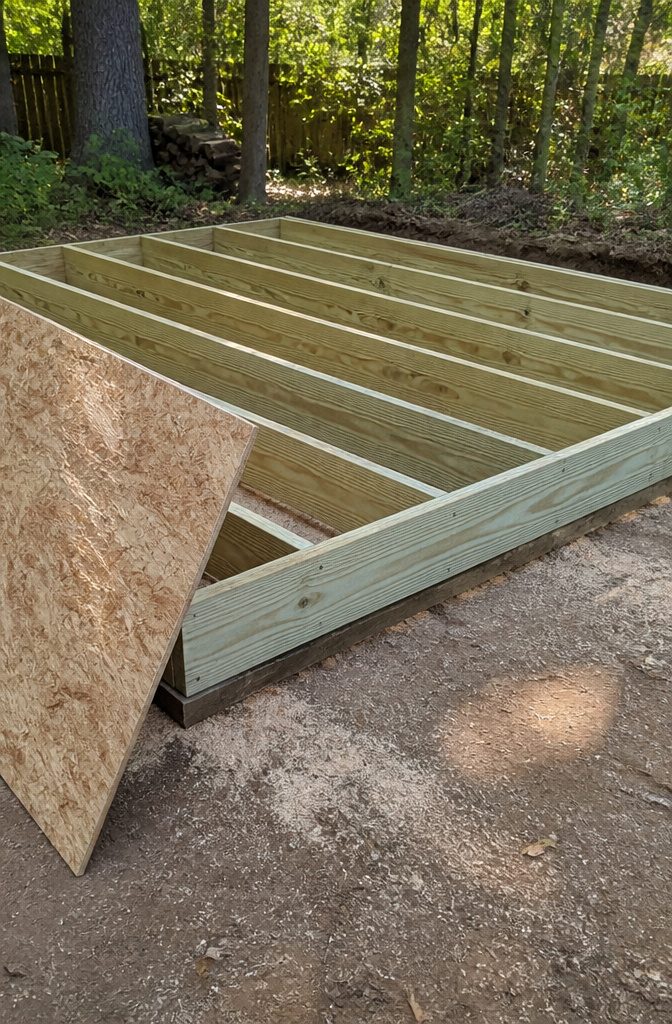
Pressure-treated 2x6s are the right lumber for floor joists on any shed that sits on or near the ground.
Standard shed sizes run from 8×10 feet up to 12×16 feet, and the framing logic stays the same: space the joists 16 inches on center and the floor won’t bounce when you wheel a mower across it later.
The pressure-treated part matters because ground contact is ground contact, even on a supposedly dry patch of yard.
Untreated lumber wicks moisture the first season and starts rotting from the bottom up where you can’t see it. The treatment buys you years, not months, before that slow failure begins.
For sheathing, 7/16-inch OSB is what most builders reach for. It is cheaper than plywood and stiff enough for a shed floor, though it hates standing water, so get your roof on before the rainy week.
Squaring the frame is where a morning of care saves an afternoon of cursing.
Measure diagonally from corner to opposite corner, then adjust the frame until those two diagonal measurements match exactly. An out-of-square floor teleports that error into every wall, every door, every piece of trim you try to fit later.
The diagonal check takes five minutes and a tape measure. Skipping it costs the whole weekend.

Durable Aluminum Construction: Made from sturdy aluminum alloy, our shed vents are designed to withstand harsh conditions, including high temperatures and humidity. They offer exceptional durability and resilience, making them a reliable choice for homes, rooftops, and sheds.

Window Duct Kit: HOXHA Dryer Window Vent Kit comes with 3 panels, a 4 inch diameter coupler with filter, 1 sealing strip, 4 screws and 2 hose clamps. (Dryer vent hose is NOT included) This kit works with standard 4 inch dryer vent hoses.

5. Constructing the Walls
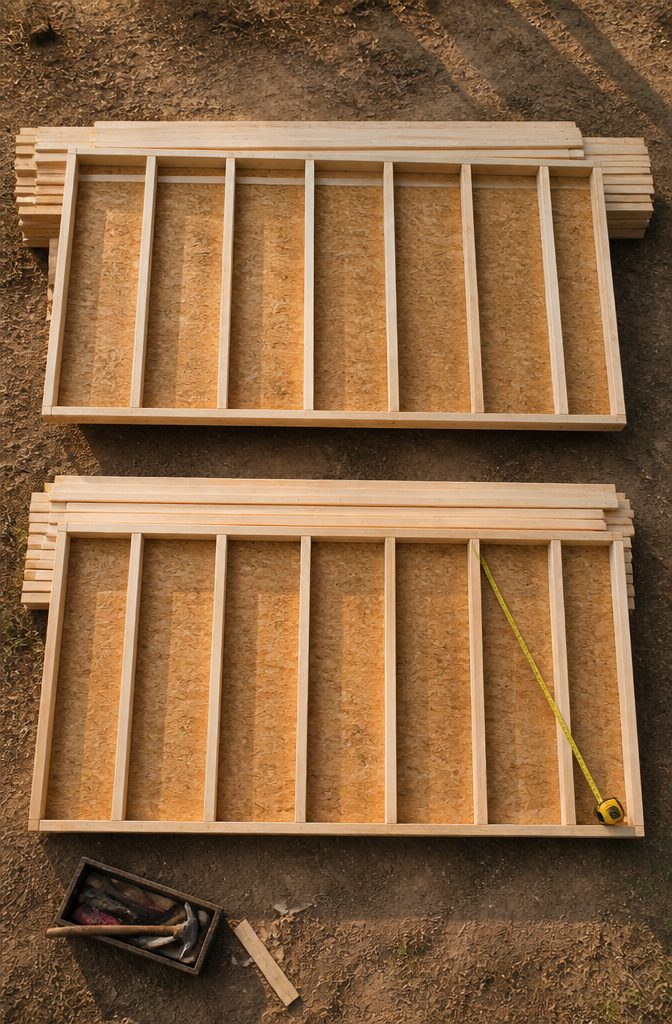
Wall framing happens flat on the floor deck, not in the air.
I start with the two longest walls, the through walls, because everything else keys off them. Two plates run top and bottom: 2×4 or 2×6 boards, depending on your load.
Studs drop in between at 16 inches on center, measured from the edge of one stud to the edge of the next. That spacing carries sheathing without flex and holds up to wind load.
The double top plate is what you nail the second layer of plate to after the wall is stood up. It locks corners together and overlaps joints in the first plate so the load transfers straight down.
Door and window openings need a header sized for whatever span you are cutting through; a 2×4 wall with a 3-foot opening gets a pair of 2×6s with a strip of half-inch plywood sandwiched between them to match the 3½-inch thickness.
Check square before you sheath. Measure diagonally from corner to corner on the flat deck and nudge the wall until both diagonals read the same.
An out-of-square wall haunts the rest of the build: doors stick, windows rack, trim gaps open up. Sheath with OSB while it is still flat, then tip the wall up and nail the bottom plate into the floor framing.
The butt walls, which usually carry the gable peak, slide in between the through walls and finish the box.
6. Raising the Walls
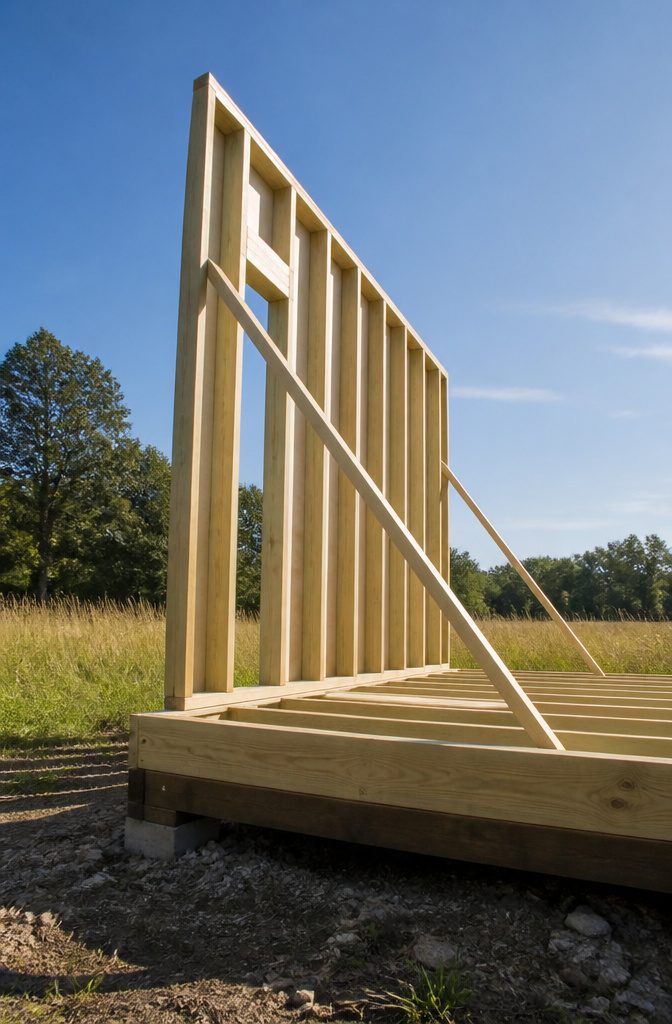
- The back wall goes up first because it has no openings and gives you a flat reference for everything else. Two people can lift most pre-built wall sections; tilt the bottom onto the floor frame, then walk the top up. Plumb the studs with a level before you drive a single nail, or every wall after it will lean with the error.
- Brace that wall immediately with 2x4s running at an angle to stakes in the ground. Wind will push a lone wall over, and a collapsed corner costs you a morning you do not have.
- Add the side walls next, working from the back toward the front so you always have a standing surface to push against. Each side wall meets the back wall at a corner; overlap the top plates where they join, nailing through the overlap so the two walls act as one piece.
- The front wall comes last, and the door opening complicates everything. The header over that gap is heavy, so a third pair of hands helps. Check plumb on both sides of the opening separately; a frame that looks square from the left can read crooked from the right.
- Walk the perimeter and nail the overlapping top plates at every corner. The double layer locks the walls together and gives the roof frame something solid to land on.
7. Adding the Roof
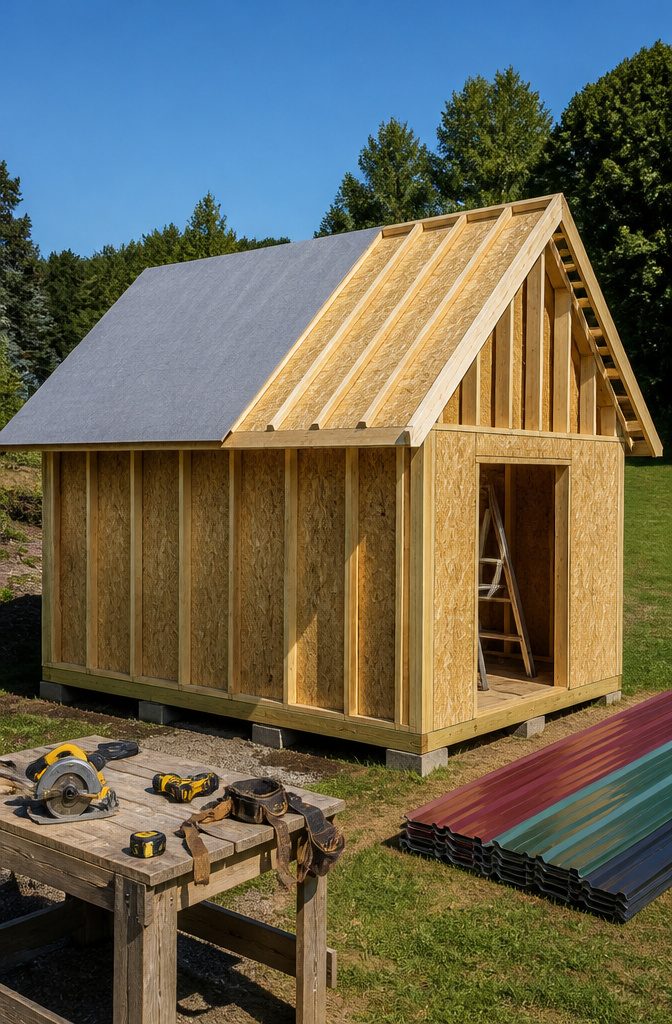
The roof framing you choose will shape every day of this build. Trusses ship from the lumberyard ready to set, one every two feet, with plywood gussets already glued and screwed at the joints.
Rafters take longer because each one is measured and cut individually, but they let you tweak the design on the fly.
For a standard gable roof, the ridge beam runs down the center and the rafters stretch from ridge to top plate with birdsmouth cuts seating them on the wall.
Either way, a 4:12 pitch is the minimum you want for asphalt shingles; anything flatter and water pools behind the tabs.
Gable roofs are the default for good reason: two matching planes shed snow fast and the triangle of wall underneath is easy to vent.
Lean-to roofs slope one direction and work when your shed backs against another building or a fence line. Hip roofs slope on all four sides and stand up to wind better, though the geometry costs you headroom and cuts slower.
If you build your own trusses, assemble them on the shed floor before the walls go up. Snap chalk lines to keep the pattern true, then use the first good one as a template.
Site-built trusses with plywood gussets are lighter than they look, but two people still make the lift safer. Add overhangs while you are at it; the extra lumber buys you drier walls and a place for brackets later.
Sheath with 7/16-inch OSB, stagger the seams, and nail to code. That layer locks the rafters or trusses together and gives you a solid deck for underlayment and shingles.

Premium Liquid-Tight Conduit: The liquid conduits are made of premium pvc material, the flexible non metallic features strong ability of protection same as metal conduit, and more flexible and light

Size: Inner diameter: 1/4", 3/8", 1/2", 3/4 Inch x 30 FT, color: black. Our split loom is split and easy to put wires in.

❤Application❤---New ! New ! New ! Special extra flexible conduit !!! This non-metallic PVC electrical conduit is perfect for using in multiple applications for electrical, telephone, cable, HVAC, refrigeration, landscape lighting and more. This product features a strong yet flexible covering that is smooth inside for easy wire pulling.
8. Installing Roofing Material
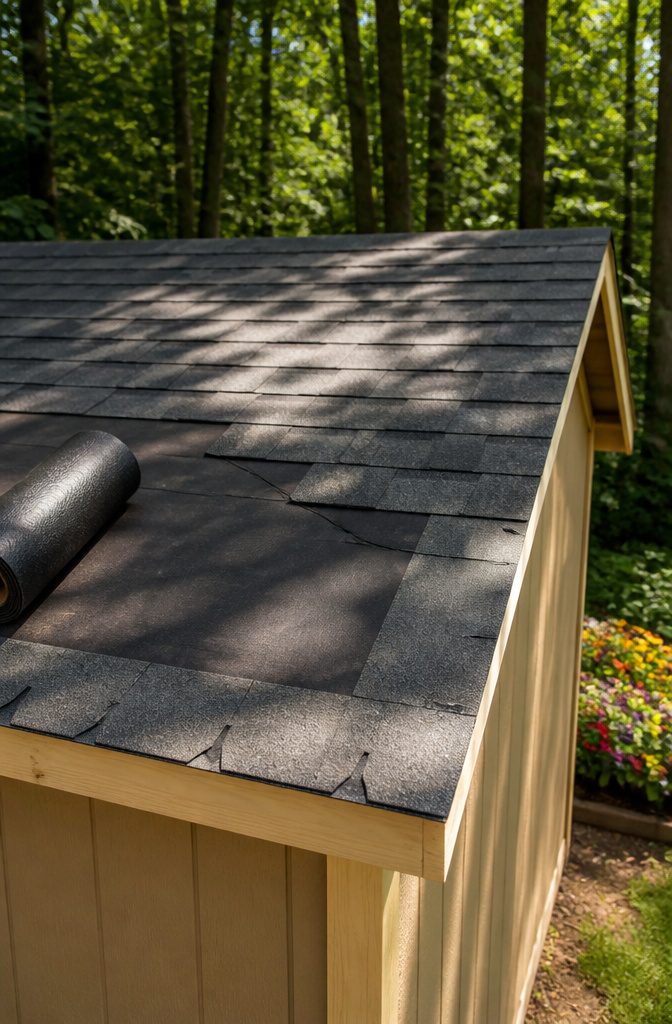
Roofing felt goes down first, stapled tight with a roofing stapler so wind cannot lift it before the shingles arrive. The drip edge nails around the whole perimeter except the peak, directing runoff away from the fascia.
Then the starter strip: the bottom course goes on upside down, its sealant band facing up so the next layer can bond to it.
Ordinary shingles follow from the bottom up, each course overlapping the one below like shingles have overlapped since they were actual shakes.
Asphalt shingles cost less and install fast on a standard gable, which is why most sheds wear them. They look familiar, they work, and in fifteen or twenty years someone else can replace them.
Metal roofing panels last longer but cost more upfront and turn rain into something you hear. Either way needs underlayment between the OSB and the finished surface; skipping it is not a corner worth cutting.
Ventilation belongs in this step, not after. A ridge cap with a vented gap, or a gable-end vent, keeps summer heat from cooking what you store and stops moisture from condensing on tools in winter.
The ridge itself finishes with cut shingles or a matching metal cap, whichever material you chose.
Order the panels the exact length you need. You’ll have a greater color selection and save a lot of work.
For anyone leaning metal, that advance order matters. Lead times run several weeks, and panels cut to length mean no circular saw work on the roof itself.

DUCTING KIT: 9-piece kit includes everything you'll need for replacing your exhaust fan's ducting


Highly Efficient Ventilation: This 8-inch x 12-inch gable vent helps reduce humidity in sheds, chicken coops, garages, and attics. The built-in mesh screen facilitates air circulation
9. Finishing Touches
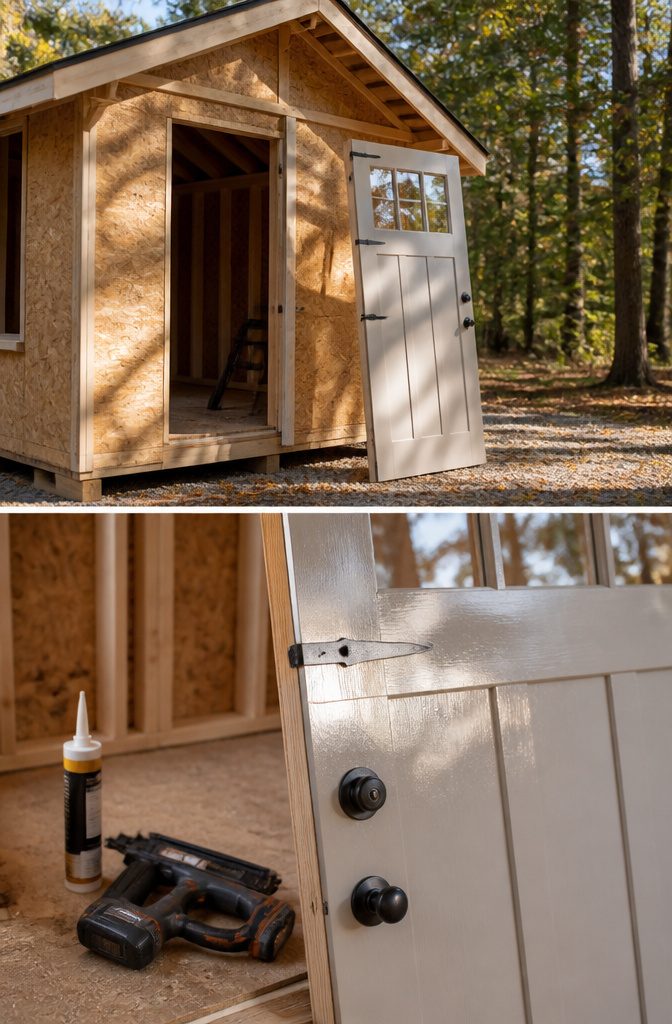
Pre-hung shed doors save enough time that the extra cost usually wins over building a frame from scratch.
The built-in route demands patient shimming; without it the door binds or the latch misses by a quarter inch and you notice every time you walk through with an armful of pots.
Window flashing works from the bottom up: membrane across the sill first, then both sides, then a final strip across the top.
Skip the order and water tracks behind the flange the first season. A thick bead of silicone caulk under the nailing flange fills the gaps you cannot see.
For trim, an 18-gauge cordless brad nailer handles the job without the cost of a larger gun.
Lay two beads of construction adhesive first; the brads only hold until it cures. Corners, eaves, and rakes all want the same treatment.
The trim closes the seam where siding meets framing, and it gives the eye something deliberate to rest on instead of raw plywood edges. F-channel and soffit finish the eaves, while corner boards take the worst of the weather head-on.
I fill the brad holes once the adhesive sets, usually the next morning, and paint the same day so the filler does not telegraph through later coats.
10. Painting or Staining
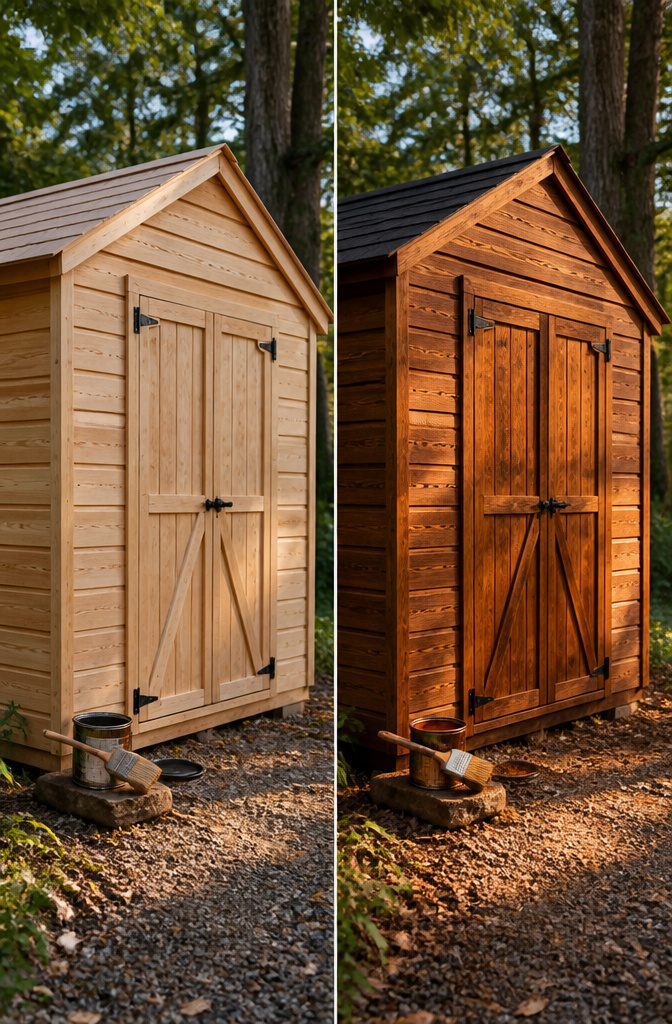
Paint films over the surface like a skin, while stain sinks in and lets the grain breathe.
That difference matters more than color choice. End grain on pressure-treated lumber is a sponge for moisture, so every fresh cut, every corner, every place the saw opened new wood needs the first and heaviest coat.
I missed a few spots on my first shed, and those edges turned fuzzy and gray within a season.
Stain needs reapplication more often than paint, usually every two to three years against five or seven, but the tradeoff is worth it if you want the wood to look like wood. Paint hides the grain behind a solid mask.
Work in dry weather between 50–85°F.
Below that, the solvent drags; above it, the surface skins too fast and traps moisture underneath. I aim for a morning that feels almost too cool, with a full day of sun ahead so the coat cures before dew settles.
Two thin layers beat one thick one every time, especially on the south wall that takes the worst of the weather.
Tools You Actually Need
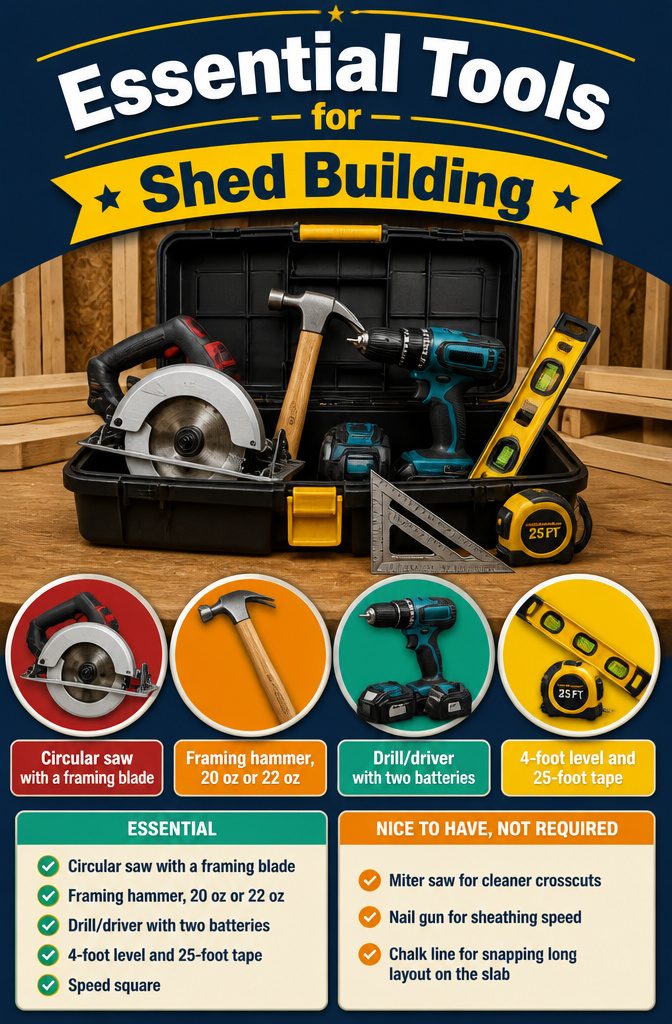
A circular saw and a framing hammer will handle ninety percent of what actually happens out there. The saw does not need to be yellow or teal; it needs a sharp blade and a fence that locks square.
My first wall leaned because I trusted the factory mark on a cheap speed square and never checked it against a known corner.
A 4-foot level, a 25-foot tape, and a drill with clutch settings for wood save you from buying twice.
Here is what matters, in order:
- Circular saw with a fresh framing blade. Ripped 2x4s and sheathing are most of your cuts. Borrow one if you must; the cut quality is what you control, not the sticker on the handle.
- Framing hammer, 20 oz or 22 oz. You will drive hundreds of nails by hand when the drill battery dies or the angle is wrong for the gun.
- Drill/driver and two batteries. One always on the charger. Pre-drill holes near ends to stop splits.
- 4-foot level and 25-foot tape. Check the level against itself: flip it end for end on the same stud. If the bubble moves, the level is the problem.
- Speed square. Use it for rafter angles and as a saw guide. Verify it with a framing square before you trust the roof cuts.
Nice to have, not required: a miter saw for cleaner crosscuts, a nail gun for sheathing speed, a chalk line for snapping long layout on the slab.
The miter saw stays home if the budget is tight; a circular saw with a steady hand makes the same cut, just slower. Rent the nail gun for the weekend if a friend does not already own one.
Materials and What They Cost
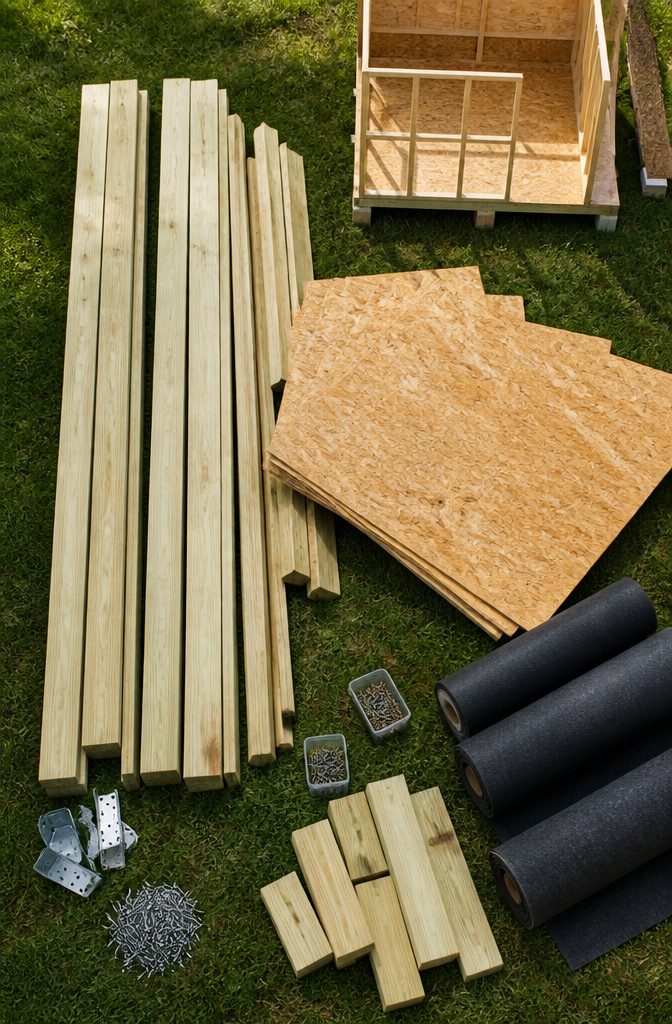
Pressure-treated 4x4s and 2x4s eat most of the budget on a shed build, and their prices move enough week to week that a quote from the yard beats guessing.
For the common 8×10 or 10×12 sizes most first-timers tackle, lumber alone usually runs between one-third and half the total material cost.
OSB sheathing for walls and roof adds less per sheet, but you will need more sheets than you first think once you account for the gable ends and the double layer at seams.
Roofing felt and three-tab shingles are the predictable line items; hardware, nails, brackets, and Simpson ties are the ones that nibble the budget empty if you grab them one bag at a time from the hardware store instead of taking the full count off the plans.
I have walked out of a lumber yard twice after the clerk updated the sticker price from what I saw online that morning, once with half my frame still on the rack.
Call ahead, lock the quote, and pad the lumber order by ten percent. The cutoff ends up as blocking or fire scraps; a mid-project shortage ends up as a second delivery fee and a Saturday stalled.
Foundation Types Compared
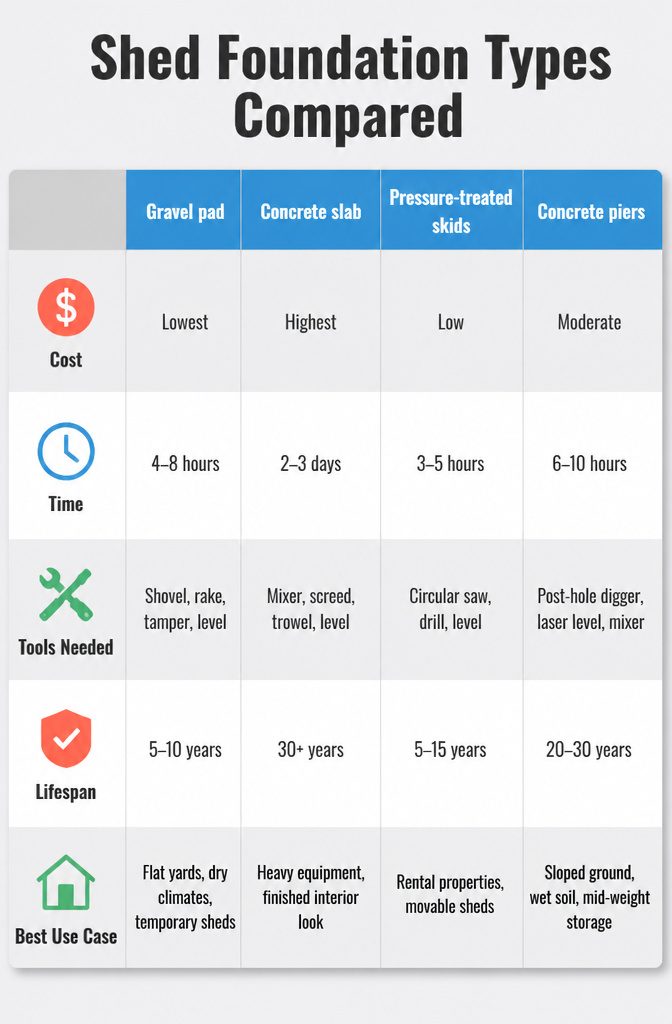
The foundation you pick for a shed is the one decision most people revisit at 2 a.m., wondering if they should have gone another way.
Gravel pads cost the least and take a Saturday to level out, but they shift in freeze-thaw cycles and work best on already-flat yards where drainage runs away from the house.
Concrete slabs last decades and give you a clean floor for storing anything on wheels, yet the mixer rental and cure time add a full weekend before you touch a wall stud.
Pressure-treated skids let you drag the whole shed to a new spot later, which matters if you are renting or suspect you will regrade the yard in five years; they rot faster if they sit in damp soil without a gravel bed underneath.
Concrete piers hit a middle ground on price and labor, lifting the frame off wet ground while leaving the center open for air to move, though getting four piers perfectly level demands a laser or a lot of patience with a water level.
| Foundation | Cost | Time | Tools Needed | Lifespan | Best Use Case |
|---|---|---|---|---|---|
| Gravel pad | Lowest | 4–8 hours | Shovel, rake, tamper, level | 5–10 years | Flat yards, dry climates, temporary sheds |
| Concrete slab | Highest | 2–3 days | Mixer, screed, trowel, level | 30+ years | Heavy equipment, finished interior look |
| Pressure-treated skids | Low | 3–5 hours | Circular saw, drill, level | 5–15 years | Rental properties, movable sheds |
| Concrete piers | Moderate | 6–10 hours | Post-hole digger, laser level, mixer | 20–30 years | Sloped ground, wet soil, mid-weight storage |
I used piers on my own build because the yard dropped six inches across the footprint and I did not want to import fill dirt.
The extra morning setting posts saved me from wrestling a slab form in mud after a rain.
If you are pouring anything, rent the mixer. Mixing by hand in a wheelbarrow turns a six-bag job into an all-day ache you will feel for a week.
Shed Designs That Work
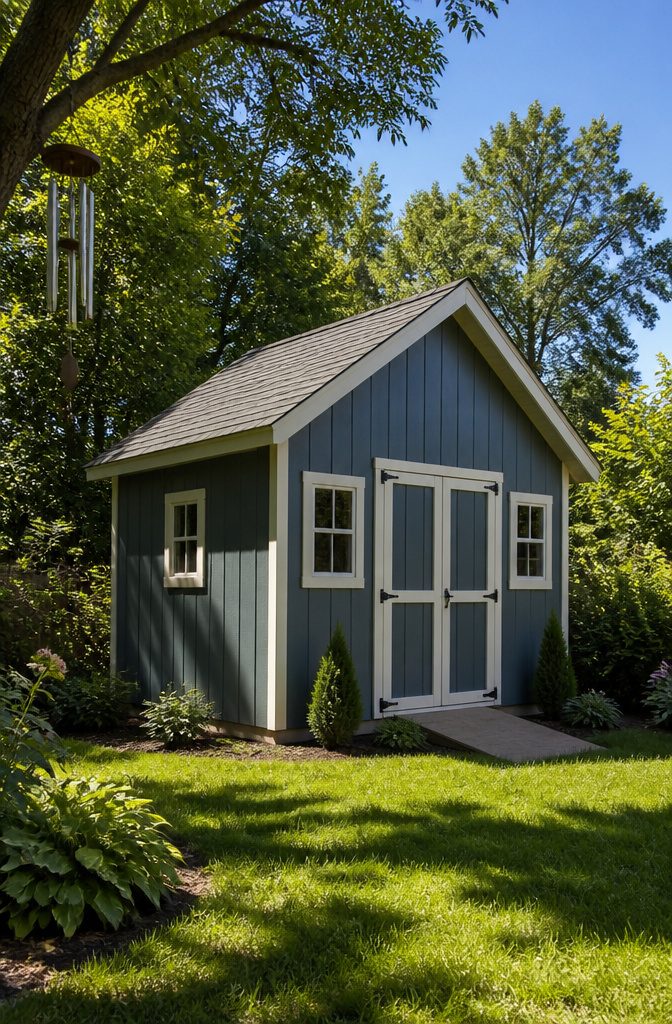
Gable roofs give you the most headroom for the least lumber.
A ridge beam down the center and rafters stretching to each wall plate, with birdsmouth notches locking them in place, create that classic peaked ceiling most people picture when they think "shed."
The space feels open enough to stand in the middle and move around without ducking.
Lean-to roofs slope in one direction, built from 2×4 or 2×6 lumber running from a high wall to a lower one.
They drop headroom on the low side but shed water faster and let you push the structure right against an existing house wall, which matters when your yard is narrow or your building permit limits footprint.
Hip roofs slope on all four sides. They cost more in cuts and in waste, but the compact look keeps neighbors and HOA boards quieter.
Storage sheds, workshop sheds, and garden sheds differ in what you end up building, not just what you store.
A storage shed wants a gable for the volume; a workshop wants windows and wall space you can reach without bumping rafters; a garden shed leans toward the lean-to because you are in and out quickly and do not need to pace the floor.
Match the roof to the hours you will actually spend inside, not to the picture that sold you on the idea.
Frequently Asked Questions
Do I need a permit to build a shed?
You usually need one if you add water, electricity, or a permanent foundation like concrete footings.
Gravel pads often keep the shed unregulated on their own, but check your local setback rules and height limits before you start; the building department will not volunteer advice, but they will stop work if a complaint arrives.
What materials do I need to build a shed?
Pressure-treated 2x6s for floor joists, 2×4 or 2×6 lumber for walls and roof framing, 7/16-inch OSB sheathing for floors, walls, and roof, roofing felt and shingles or metal panels, plus nails, screws, flashing, and caulk.
Hardware and fasteners are the line items that drain the budget if you buy them one bag at a time instead of counting off the plans upfront.
How do I choose the right location for my shed?
Pick flat, dry ground that sits above where puddles form after hard rain. Keep a few feet of clearance on all sides so siding breathes and sunlight blocks mold.
Sunlight and afternoon light matter if you will use the shed as a workshop, and proximity to the house matters if you plan to run power.
What type of foundation should I use for my shed?
Gravel beds cost least and drain fast, concrete slabs handle heavy loads and last longest, and treated 6×6 skids or concrete blocks let you build the same weekend and move the shed later.
The bottom of any foundation needs to stay at least 2 inches above grade to stop rot and rodents.
Can I build a shed for $1000?
That budget is tight for even a small shed. Lumber alone typically runs one-third to half of total material costs for an 8×10 or 10×12 build, and that is before roofing, hardware, and fasteners.
A gravel pad foundation and a lean-to roof help keep costs down, but $1000 usually covers a very small footprint or requires salvaged materials.
What are the common mistakes when building sheds?
Plumbing the first wall wrong, which leans every wall after it; skipping the diagonal check to square the floor frame, which warps every door and window; and pouring concrete without calling 811 to mark utilities.
Can I put a shed directly on paving slabs?
A shed floor sitting directly on any solid surface at ground level will rot, invite rodents, and shift as the ground underneath moves.
Even on paving slabs, the bottom of your foundation needs to stay at least 2 inches above grade, with drainage underneath so water does not pool against the wood.